Grand Cherokee Factory Export E-code Headlamps
'93-'98 Grand Cherokee Factory Export E-code Headlamps: By: Scott Mueller
scottmueller@compuserve.com Are you of the opinion that the stock headlights in the '93-'98 Grand Cherokee (ZJ) could use some improvement? I am! Fortunately there are dramatically superior headlights available built especially for the GC. I am talking about European E-code export headlights, which take superior H4 halogen bulbs. These lights have a MUCH better light pattern than the US headlamps, specifically they have a sharp light cutoff which lights up the road better and at the same time prevents glare to oncoming drivers. These lamps are installed on GCs used in RH rule (LH drive) European countries like Austria, the Netherlands, and France, which have to meet far more stringent (E-code) lamp quality requirements than here in the US (DOT). Besides the sharp cutoff, there is more light projected up and to the right for illuminating signs and other objects on the shoulder. The H4 bulbs (55/65w) supplied with the lights are brighter than the crappy 9004 bulbs (45/65w) used in the DOT-spec lamps. It's not just the higher wattage, but also the design and construction of the H4 bulb is better as well. Additionally H4 bulbs are available in more different versions than 9004 bulbs, including higher wattages (I am using 80/100w bulbs), and with different dichroic coatings such as yellow for superior visibility. The E-code lamps also have superior optics in the lens, and are glass instead of the cheap plastic in the DOT-spec lamps. Note that with US spec lamps the higher wattage bulbs combined with the high mounting point for the headlights on the typical SUV results in extreme glare and irritation for oncoming drivers, but with the sharp light cutoff in the E-code lamps, this is not a problem at all! The additional light is kept on the road where it belongs and not in the eyes of oncoming drivers. I have been running E-code export lamps on most of my vehicles for years. Once you've had E-code lamps on your vehicle, you will not be able to stand the crummy US DOT spec. lamps anymore! The installation is simple, the new lights physically install as direct snap-in replacements for the old ones, so it takes about 5 minutes to snap out the old ones and snap-in the export units. The only other changes required are to splice on the proper connectors. I made adapters with both connector ends so I can run either the export or US lamps as I choose. The export lights use H4 bulbs which are superior to the 9004 bulbs used in the US lamps. The H4 connectors are the same as the older style sealed beam connectors and are available at any auto parts store. The export lamps light the road evenly in a much wider pattern, with a sharp cutoff that prevents blinding oncoming or proceeding drivers (even with brighter high wattage bulbs), and the additional light to the sides, especially the RH shoulder, is incredible. They also have glass lenses which are optically more distortion free and remain clear, cloud and scratch-free throughout their life, and which can also take the heat of high wattage bulbs better. There are several factory part numbers for E-code lamps for the Grand Cherokee, but only one of them fits properly on US vehicles. The different lamps are listed in the dealer parts books as: -US (LH drive) -Germany (RH drive) -Europe (RH drive) -Europe other than England (LH drive) -Japan (RH drive) Of course you want LH drive (referring to the fact that the steering wheel is on the left side of the vehicle and you drive on the right hand side of the road) lamps as the others are for people who drive on the "wrong" side of the road
, and have the light pattern adjusted accordingly. Using the wrong ones will result in a light pattern that blinds oncoming traffic. While the "Germany" and the "Europe other than England" lamps are both LH drive like the US lamps, only the "Europe other than England" ones are a direct physical replacement for the US lamps. As an example somebody I know accidentally purchased the German spec. versions which unfortunately aren't a direct snap-on fit. To get them to work they had to kludge up the mounts by grinding and epoxying the US mounting clips to the rear of the lamps. Even then they wouldn't fit properly, mainly because the US mounting system requires one of the clips to slide in a captive rail in order to move up and down to accommodate the lamp adjustment. In the end the fit was unsatisfactory and the expensive lamps had to be changed out for the proper ones. The German spec. lamps have different mounting provisions due to the in-dash adjuster used on German vehicles. The proper "Europe other than England" lamps are what I installed on my GC and they snap *directly* on the standard US adjuster mounts with no modifications required. They have the same sliding clip and are a direct interchange for the US lamps. For your reference, those are: P/N Description Note ------------------------------------------------------------------ 55055124 '93-'98 ZJ LH export headlamp Europe other than England 55055125 '93-'98 ZJ RH export headlamp Europe other than England It would be nice if you could just order them from your local dealer, however Chrysler has a policy of not allowing export parts to be sold in the US. The order cannot be placed via the normal system, all orders for export parts are automatically rejected. You can try your local dealer, but I doubt you will have any success. Fortunately I have located an excellent source for these elusive lights. A friend of mine (Dan Stern) runs an automotive lighting company (Stern Lighting) and can obtain these lights from Chrysler. Contact him at dastern@vrx.net for the details, including pricing. You can also check out his company website at http://lighting.mbz.org Dan has also located another set of ZJ E-code lamps which are a direct fit, and which have a stepped rather than an angled E-code light pattern. Some prefer the stepped over the angled cutoff pattern. Contact Dan for more information on the different headlight and bulb options. They are somewhat expensive, but even at about $450 for a pair they are WELL worth it in my opinion. Even if they cost more they would be worth it as the light pattern is so much better than the US versions. Bulbs: The stock US lamps take 9004 (HB1) 45/65w bulbs which are rated at 58/100 candlepower (cp) in output. These bulbs are of a notoriously poor design with transverse filaments that waste much of the light on non-focused and non-reflecting areas of the lamp. They also have very small electrical contacts which have a high resistance and can become very hot under a higher than normal wattage load. That is why none of the reputable name brand bulb manufacturers sell higher wattage 9004 bulbs. The export lamps take superior H4 (HB2) 55/60w bulbs which are rated 83/138cp in output. These bulbs are included with the lamps. H4 bulbs are very efficient, and have axial filaments which allow for more of the light to be properly focused and utilized by the reflector. Note the significantly higher light (candlepower) output of the H4 bulb as compared to the 9004 type used in the US lamps. In fact the standard 55/60w H4 has over 43% greater output on low beam, even though it draws only 5w more power! This is true even on high beam, where the poorly designed 9004 bulb in the US lamp produces only 100 candlepower of output from 65 watts while the more efficient H4 bulb used in the export lamp produces 138 candlepower from 60 watts. In my case I wanted even more output, so I installed 80/100w H4 bulbs which are rated for 125/217 candlepower output. This is over 115% more output on low and 117% more output on high as compared to the stock US lamps. In fact I have more output on low beams than the US lamps have on high beam! High quality replacement bulbs in higher wattages are available through Stern Lighting at http://lighting.mbz.org or PUMA at http://www.puma-access.com. They both carry some of the best bulbs like the Narva brand manufactured in Germany. Now if you think this will cause problems for other drivers, take note that even with the dramatically increased output, the sharp cutoff and superior light pattern of the export lamps prevents blinding oncoming traffic. The light is focused down on the road, and little or no light escapes past the cutoff. This keeps oncoming drivers as well as those in front of me in my lane happy, as long as I am on low beams that is. The high beam output on the other hand IS blinding, will sear retinas at 100 meters, and may melt the paint off the rear bumper of the car in front of you. An important feature of the export lamps is their heavy duty construction. The export lamps can better take the heat of high wattage bulbs, since they have glass lenses and ceramic reflectors, and the H4 bulbs themselves have much larger electrical contacts designed for this amount of power without adding unnecessary resistance. Relay Harness: To eliminate potential problems with drawing 200 watts of power (both lamps on high beams) through the stock vehicle wiring harness, and to bring the maximum voltage to the bulbs, I installed a relay harness. There are several ready made harnesses on the market, but IMHO you can't beat the Painless Wiring harness #30815 http://www.painlesswiring.com/relays.htm. This harness uses high quality *sealed* 40-amp Bosch or Hella relays with *weather tight* sealed connectors in an industry standard ISO terminal configuration (meaning you can get replacements anywhere, from any Jeep dealer for example), corrosion resistant nickel/tin-plated terminals throughout, and includes a 30-amp fuse in a Packard weather tight fuse holder. The wire throughout is OEM specified high temperature TXL (thermal cross linked) wire. TXL wire is kink and abrasion resistant, thin-walled for any given gauge, and is designed for a 275-degree F rating. This is exactly the same wire used by the factory for high temperature under the hood applications. It includes the proper connectors for the E-code (H4 bulb) lamps, if you are using the original 9004 bulbs you'll have to install those connectors. You can get the Painless Wiring headlight harness #30815 for only $75.99 through Summit Racing http://www.summitracing.com (800-230-3030) or Jeg's http://www.jegs.com (800-345-4545). If you are going to use a different brand harness, I have some tips. No matter what I'd *stay away* from harnesses that use un-sealed relays with non-standard (non-automotive type) pin configurations (you can't easily get replacement relays), un-sealed relay connectors, corrosion prone unplated brass terminals, fusible links instead of a real fuse, and low temperature "bell" wire. The lowest quality harness I've seen so far (it had all the "bad" attributes listed above) was a cheap "Car Show" brand with distinctive yellow jacketing on the wires. If you live in an area where the roads are salted, better stay away from that one! I made a mistake and purchased one of those before I knew better. When the cheap relays corrode and fail, you'll be running without lights, and that's not much fun. Note that Summit/Jeg's both sell the junk "Car Show" harness for $52.99, but considering the vastly superior Painless Wiring harness is only $23 more, the poorly constructed harness isn't much of a bargain. Some don't think the relay harness is necessary, I'd agree only if you stick with stock wattage bulbs, but even then a relay harness will result in brighter lights. If you use higher wattage bulbs then you risk overloading the stock circuit and switch. I have measured as much as a 2.5v drop to the headlights using 100w high beams through the stock harness, which means not only are you heating up a bunch of wire (and the headlight switch, which will eventually fail due to the load), you are reducing the brightness of the higher-powered bulbs considerably. With the relay harness, there is less than a 0.5v drop, no damage to the stock harness, and the lights are much brighter as a result. If you are going to use the standard H4 bulbs which are included with the export lights, then changing the wiring (other than the connector end) is not necessary, however by using a harness even with the stock wattage bulbs, voltage drop will decrease, and brightness will increase. I find that running stock bulbs with the harness are just about as bright as 80/100W bulbs without a harness, due to the voltage drop problem with the higher powered bulbs. Some have been using 80/100w bulbs with the stock wiring and getting away with it, but after measuring the voltage drop and studying the stock harness there is no way I could condone that. Installation: Installing the E-code lights is simple, merely unsnap the stock lamps fromtheir ball-stud mounts and snap the new lights back in place. I sometimes use a quarter inch thick wooden dowel to assist in prying the lamps off the mounts to prevent damage to the fender or grille. [one_third]  [/one_third] [two_third_last] This picture shows the rear of the export headlamp close up, you can clearly see the three snap mounts where the light snaps onto the ball studs just like the stock headlamps. The clips are included with the lamps and are identical to the ones supplied on the domestic lamps, two round and one square clip are used on each lamp. [/two_third_last] These clips are notorious for breaking when removing or installing the lamps in colder temperatures, so it might be prudent to have a few extra on hand. You can purchase them separately or you can remove the clips from the set of lamps you are not using and keep them as spares. I recommend having a few of these clips in the glove box should you need to remove the lamps to replace a burnt out bulb on the road. If you want to purchase a few extra, here are the part numbers and prices: [/et_pb_text][et_pb_text admin_label="Text" _builder_version="3.0.51" background_layout="light" text_orientation="left" border_style="solid"] P/N Description Price Note --------------------------------------------------------- 4762489 Round hdlp mtg clip $6.50 2 used on each lamp 4762490 Square hdlp mtg clip 6.87 1 used on each lamp These clips are included with the lamps and extras will only be needed if you break them. List prices are shown, normally you can get a 25% wholesale discount from list. [one_third]
 [/one_third] [one_third]
 [/one_third] [one_third_last]
 [one_third_last][/one_third_last] [/et_pb_text][et_pb_text admin_label="Text" _builder_version="3.0.51" background_layout="light" text_orientation="left" border_style="solid"] The pictures above show the correct E-code (export) headlights and the domestic lights side by side. The E-code is on the left and the domestic headlight is on the right in each picture. As for the wiring, the E-code lamps use H4 bulbs which require a different connector than the US type 9004 bulbs. You can purchase H4 headlight bulb connectors at any parts store, or you will get them with the Painless Wiring headlight harness I recommend. If you are not using the harness, then purchase two H4 bulb connector pigtails and splice them onto the wiring next to your stock connectors. With both connectors in place you can switch back to the stock lamps anytime (such as when selling the ZJ). I decided that I would use the PW relay harness, and although it came with the H4 connectors already installed I wanted to be able to switch back to the US headlamps quickly if necessary (such as if I broke a lamp). What I did was cut the H4 connectors (with about 4" of wire) off the end of the harness and attach 3-pin Packard Weatherpack connectors (you could also use Metri-Pack 280 connectors) at the ends of the harness. Then I attached the mating Weatherpack connector on the 4" end I had cut off. I did the same with a set of 9004 connectors (you could cut them off the stock harness) and ended up with interchangeable connector ends so I can use either the E-code or US lamps at will. You can get Weatherpack connectors and terminals from http://www.waytekwire.com. [one_half]
 [/one_half] [one_half_last]
 [/one_half_last] The two pictures above show the wiring adapters I made for my headlight harness. The blue connector is used when running 9004 bulbs (domestic lamps), and the black connector is used when running H4 bulbs (E-code lamps). I added mating 3-pin Weather pack connectors on the end of the PW harness so I can change from domestic to E-code headlights as easily as snapping on the new lights and plugging in the proper connector end! Note the much larger terminals on the H4 connector, which better supports higher watt bulbs. [/et_pb_text][et_pb_text admin_label="Text" _builder_version="3.0.51" background_layout="light" text_orientation="left" border_style="solid"] Installing the PW harness is a little more time consuming, depending on how professionally you want it to appear. I removed the front bumper fascia so I could route the wiring adjacent to the stock wires inside the bumper support across the front of the vehicle. I mounted the relays behind the passenger side headlight, and attached the main power to the Power Distribution Center (PDC) power terminal and the ground to the main engine compartment ground on the passenger side inner fender. [one_half]
 [/one_half] The picture ZJRelay-Mount1.jpg shows the Painless Wiring harness dual 40A relays which I mounted back to back just behind the passenger headlight. The two relays on the left side of this picture are the (Bosch or Hella mbrand) PW harness relays, the other two relays to the right of center are the factory relays for the high and low speed electric engine cooling fan used only on the 5.9 Limited. To mount the headlight harness relays I made up an L-bracket, and mounted the relays through an existing hole in the sheet metal using one stainless nut and bolt, two stainless fender washers, and two rubber washers. I placed the rubber washers on either side of the hole in the sheet metal, then put the stainless fender washers over the rubber washers, and then ran the bolt through the washer sandwich and through the L-bracket. This results in a vibration isolated mount that does not even scratch the paint around the existing hole! [one_half]
 [/one_half] [/et_pb_text][et_pb_text admin_label="Text" _builder_version="3.0.51" background_layout="light" text_orientation="left" border_style="solid"] The picture ZJRelay-Mount2.jpg shows the relay mount from the front side. You can see the stainless fender washer with the stainless nut and bolt. The rubber washers are underneath the fender washers. [one_half]
 [/one_half] The picture PWHarness-connect.jpg shows the connections for the headlight harness. They are kind of hard to see because they look as if they are part of the factory harness. The main power wire is connected to the main electrical power stud on the side of the under-hood Power Distribution Center (PDC). You can see the headlight harness wire in convoluted loom just next to the main red heavy gauge cable from the alternator to the PDC main power stud. The stud is covered by a protective cap, and the wires come out the front side. The harness ground is attached to the rearmost of the two main ground bolts on the fender just in front of the PDC. Since it is also covered in convoluted wiring loom, these wires look as if they were factory installed. [one_half]
 [/one_half] The ZJHarness-route.jpg picture shows the routing of the headlight harness. Actually you can't see the harness in the picture although it is installed. I routed it alongside the main cross car harness that comes out just beside the radiator on the LH side of this picture, goes into a channel inside the front bumper support, and then back around the radiator on the other side. With the harness routed along with the factory harness, it is out of harms way and in fact can't even be seen. Note: you can also see the factory trans cooler (on the left) and power steering cooler (on the right) I added to my 5.9 Limited. None of the '98 V8 models came with the trans cooler, even with the towing package! The power steering cooler is my own "invention", I used the trans cooler designed for the 6cyl ZJ, which mounts on the opposite side from where the V8 trans cooler mounts. [one_half]
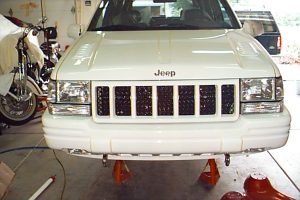 [/one_half] The picture ZJE-code.jpg shows the finished product, with the E-code lights installed. I also changed the factory tow hooks to chrome versions and added stainless clips, and I painted the grille inserts black on the 5.9 grille. The grille was originally all white and didn't look proper that way. Scott. [/et_pb_text][/et_pb_column][/et_pb_row][/et_pb_section]